
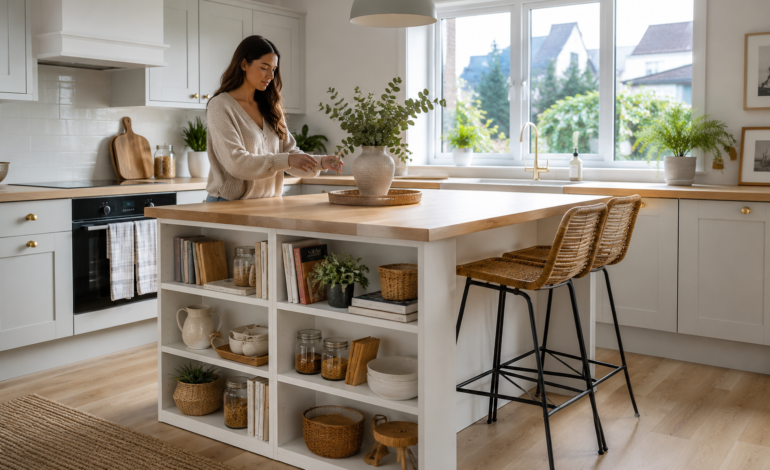
Ikea Billy Bookcase Kitchen Island Hack

If you’re looking for a clever, budget-friendly way to add more storage and prep space to your kitchen, the IKEA Billy bookcase kitchen island hack is one of the best DIY projects you can try. It’s affordable, surprisingly achievable, and the end result looks far more expensive than it actually is.
Thousands of homeowners have pulled this off with nothing more than a couple of Billy bookcases, some basic tools, and a bit of patience. Here’s everything you need to know to do it properly.
What Is the IKEA Billy Bookcase Kitchen Island Hack?
The IKEA Billy bookcase kitchen island hack involves combining two (or more) Billy bookcases to create a freestanding kitchen island unit. The bookcases are secured together, fitted with doors and shelving, and topped with a solid worktop.
The Billy bookcase has become the go-to choice for this type of project because it is:
- Priced affordably, often under £60 per unit
- Available in a range of widths and heights
- Compatible with IKEA’s own range of doors, drawers, and inserts
- Easy to assemble without specialist skills
It is one of the most searched DIY kitchen hacks in the UK, and for good reason.
Why It Works So Well
The appeal is straightforward. A bespoke freestanding kitchen island can cost anywhere from £400 to over £1,500. Using two Billy bookcases, a solid worktop, and a few accessories, most people complete this project for between £150 and £300.
Beyond the cost savings, this hack is endlessly customisable. You can paint the units in any colour, add shaker-style doors, install internal drawers, or leave one side open for book and basket storage. The result genuinely looks purpose-built, not flat-packed.
The Billy frame itself is also more robust than many people expect. With proper reinforcement, it handles everyday kitchen use very well.
What You Will Need
Before you start, gather your materials:
- 2 x IKEA Billy bookcases (the 80cm wide option is most popular)
- A solid timber, butcher block, or laminate worktop, cut to size
- Wood screws (at least 6cm long) and a drill
- Wood glue for reinforced joins
- Sandpaper, wood filler, and primer
- Paint of your choice (chalk paint works brilliantly)
- Furniture feet or legs for added height (optional)
- Panel doors or IKEA Oxberg doors (optional)
Useful tools include a spirit level, tape measure, clamps, and a jigsaw if you need to trim the worktop to fit.
How to Build an IKEA Billy Bookcase Kitchen Island
Step 1: Measure Your Space
Start by measuring where the island will sit. Allow at least 90cm of clearance on all sides so you can move around freely. The standard kitchen island height is around 90cm, so check whether your Billy units, worktop, and feet will reach that measurement once assembled.
Step 2: Build the Bookcases
Follow the IKEA instructions to assemble both units. If you plan to join them back-to-back, hold off on attaching the rear panels for now. This gives you better drilling access during the joining stage.
Step 3: Join the Two Units Together
Place the bookcases back-to-back on a flat surface. Using your drill, drive screws through the side panels at multiple points, both top, middle, and bottom. Apply wood glue along the joining edges before screwing for extra rigidity. Leave this to dry fully before moving on.
Step 4: Decide on Your Back Panel Arrangement
You now have two options. Keep both sets of back panels for a fully enclosed unit with interior shelving on each side. Or remove one set of panels to create open shelving on both faces of the island.
Step 5: Add Doors and Drawers
IKEA’s Oxberg doors are designed to fit Billy frames directly. For a more premium look, fit MDF shaker-style panel doors instead. These can be painted in any colour and give the unit a far more custom, furniture-quality appearance. Attach using standard cup hinges.
Step 6: Fit the Worktop
Cut your worktop to size if necessary, allowing a slight overhang on one or both sides. Secure it from underneath using metal brackets and screws. A solid oak top is the most popular choice as it gives the unit a warm, high-end look. If using a butcher block style, seal it with food-safe wood oil before use.
Step 7: Fill, Sand, and Paint
Fill any visible screw holes with wood filler, sand everything smooth once dry, and apply your chosen paint. Two coats of chalk paint in a deep navy, sage green, or warm off-white gives a result that looks genuinely bespoke.
Finally, fit your furniture feet, install any handles or hardware, and style the island with accessories, a pendant light above, and bar stools alongside.
Design Ideas Worth Considering
Create a Breakfast Bar Overhang
Extend the worktop by 25 to 30cm on one side to create a seating overhang. This turns the island into a breakfast bar with minimal extra effort.
Go Bold With Colour
The Billy frame takes paint exceptionally well. Deep colours currently trending in UK kitchens include forest green, charcoal, and dusty rose.
Mix Closed and Open Storage
Fitting doors on the lower section and leaving the upper shelves open creates a balanced, practical storage layout.
Add a Worktop Power Socket
If you are comfortable hiring a qualified electrician, installing a worktop socket dramatically improves the island’s practicality for everyday use.
Pros and Cons at a Glance
Pros:
- Significantly cheaper than bespoke or pre-made kitchen islands
- No specialist skills required
- Highly adaptable in terms of size, finish, and storage layout
- IKEA parts are easy to replace and widely available
Cons:
- Billy bookcases are not rated for very heavy loads on the surface
- Requires careful finishing to avoid a DIY appearance
- May not blend seamlessly in very high-end kitchen environments
- Reinforcement is essential for long-term durability
Conclusion
The IKEA Billy bookcase kitchen island hack is one of the smartest budget DIY projects available to UK homeowners right now. It delivers genuine kitchen functionality, adds meaningful storage space, and can look indistinguishable from far more expensive bespoke joinery.
Whether you are renting and need something flexible, Cook Tri Tip in Oven renovating on a tight budget, or simply want a practical weekend project with real visual impact, this hack is well worth your time and effort. Plan carefully, take your time with the finishing, and the result will genuinely surprise you.
Frequently Asked Questions
1. Can IKEA Billy bookcases support a kitchen worktop safely?
Yes, they can support a worktop well when properly reinforced. Join the units securely with screws and wood glue, and choose a worktop that distributes weight evenly. Avoid placing extremely heavy items directly on the centre of the surface without additional support underneath.
2. What size Billy bookcase works best for a kitchen island?
The 80cm wide Billy bookcase is the most widely used option. Two units placed side by side or back-to-back create a 160cm island, which suits most kitchen layouts. The 106cm height version is worth considering if you want a lower profile without cutting anything down.
3. How much does this hack typically cost in the UK?
Most people spend between £150 and £300 in total. The main variables are the worktop material and whether you opt for doors. A laminate worktop keeps costs lower, while a solid oak or walnut top increases the overall spend but significantly improves the look.
4. Do I need planning permission to add a kitchen island?
No. A freestanding kitchen island is treated as furniture in the UK, not a structural change, so no planning permission is required. If you are adding electrical work such as a worktop socket, you should always use a qualified, Part P registered electrician.
5. How do I make the Billy kitchen island look like a built-in unit?
The key steps are: matching the paint colour to your existing kitchen cabinets, using the same worktop material as your current countertops, and adding timber moulding or beading to fill any gaps between the unit and nearby walls or appliances. This creates a seamless, fitted appearance.